Sunday, July 31, 2016

Two Little Divers!!

Well, it's official!  We have two divers!  Baylor finally got the hang of it.  This isn't his best dive - he had a couple really good ones - but you get the idea.


Amalia was having a little trouble diving too deeply, so I tried to teach her to dive like Olympian swimmers do when they go off the blocks.  She thought that was just the best idea!


They are still learning, obviously, but it is a great start!  I'm so proud of my little divers.

Tuesday, July 26, 2016

Little Diver!

Yesterday while we were swimming at my parents' house, I asked Amalia if she wanted to learn how to dive.  She took me up on it, and after a little more instruction today this happened:


Aside from the dive in this video, she has a tendency to dive rather deep, but she's certainly getting the hang of it.

Baylor also is interested in learning to dive and said he would keep trying until he got it!  I can't wait to post his video on here soon.

I'm so proud of them both!

Saturday, July 16, 2016

Adventures of a Knight Museum Camp

The week of the Fourth the kids went to a museum camp titled, "Adventures of a Knight".   Back when they were picking camps for the summer, they decided to do this museum camp together because they had never done a museum camp before and were a little nervous about it; they figured they would be less nervous about it if they were together.  They were right.

On the first day, upon arriving at the museum, we were greeted by a knight and a queen in full costume.  Ordinarily this would be a huge problem; Baylor does not like it when people are wearing costumes and often resists interacting when he encounters this.  After a little reassuring, though, he was okay enough to go off with the knight and queen ... and his sister, of course.

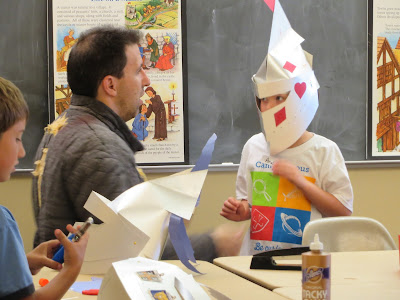
The first day they made shields with their own crests and learned about life during medieval times.  The second day they made castles out of tissue boxes, tried out a trebuchet, and watched the knights use real medieval weapons to bash and slash some melons.  The third day - the last day - was special. First, they made helmets.


(That's the queen; she did a ton of arts and crafts in that huge dress, complete with a hoop skirt and corset.  Amazing, if you ask me.  Plus, she was incredibly kind to the kids.)


The main knight was also very kind and patient with the kids.


They then had a little tournament, complete with a ring toss, Nerf bow and arrow shooting, and a pool noodle sword fight with a real knight in armor.  Amalia was the only girl in the class, but she held her own.


I was so proud of Baylor for actually participating in the events!


He and Mollie both tried out each event, even the pool noodle sword fight.


After the tournament, they helped the two knights who hadn't done the sword fight get back into their armor.


After Baylor's knight was redressed, Baylor headed over to the book area to read a bit.


Then the kids got their helmets (except for Baylor who informed us that he made his helmet for decorative purposes) and their shields and practiced their defensive maneuvers.


Mollie put on her game face for the jousting.


That's right, the jousting.  The kids all got on the carousel and prepared for a joust with the knights.  Baylor preferred to sit in one of the stationary seats, but he rode the carousel, something he hasn't done in years.


Mollie, on the other hand, chose a bejeweled galloping horse.


And then they jousted!


They got to joust with two knights, the one you could see on the video and one at the back of the carousel.

After the joust, the kids came out into the vestibule under the giant whale skeleton, demonstrated their skills with their shields, and then sat down and prepared for the fight.


That's right!  The three knights took turns fighting each other, full-clad in armor, with real medieval weapons.  They started with swords, then moved on to a mace, a war hammer, and a flail.  It was, to say the least, intense.


After the fighting, each child was made a knight, dubbed so with a real (though rather dull) sword.  As the only girl, Amalia was dubbed, "Dame Amalia the Fierce"; she later informed me that she didn't like the "dame" part and would prefer to be called a "lady".  Baylor did not want to have anything added to his name, nor did he want the sword anywhere near him, so they accommodated him and simply called him "Sir Baylor".  I tell you, these people were amazing, so kind and compassionate.


All in all, the kids had a fantastic time and had a bunch of wonderful new experiences.  Two very enthusiastic thumbs up for the Adventures of a Knight museum camp!

That's What They Said: Learning All Sorts of Things

(While playing Brain Quest ...)
Baylor:  Oh, Mollie, I will give you the second grade one!  You will know this.
Amalia:  Okay!
Baylor:  What are the names of the Great Lakes?
Amalia:  Oh ...
Baylor:  You want my help?
Amalia:  Sure!
Baylor:  Okay, let's say them together!
Both:  Michigan ...
Baylor:  Huron ...
Amalia:  The Lake ...
Baylor:  What?  No.
Amalia:  Yes it is!  Remember, sometimes we say, "We're going to The Lake!"?
Baylor:  (sighing)  Okay, I'll show you a different way.  It'll help you remember it.  Huron ... Ontario ... Michigan ... Erie ... Superior.  How many was that, Amalia?
Amalia:  I don't know.
Baylor:  It was five.  There are five Great Lakes, and you can spell the word HOMES with the first letter of each of them.  H - O - M - E - S
Both:  (singing)  H, O, M, E, S!  H, O, M, E, S!


(After hearing my watch buzz on the hour ...)
Baylor:  It's 9:00!
Me:  Nope, it's 8:00.
Baylor:  Oh.  I thought I woke up at 8:40 not 7:40.  Oh well.  Misunderstandings!


(While watching the Tour de France ...)
Baylor:  Why aren't they speeding?
Bryson: Well, because they are working really hard going uphill.  They'll go faster when they go downhill.  Just wait.
Baylor: Is anyone going to hurl?


(While watching the Olympic track and field trials ...)
Bryson:  Oh, well it looks like we're watching another long race.
Me:  How long is it?
Bryson:  5,000 meters.
Baylor:  That's a long run!  Is anyone going to hurl?


Amalia:  My (imaginary) daughters are at their house doing experiments and they broke the sound barrier!  And now they don't know how to fix it!
Bryson:  (smiling)  They broke the sound barrier?
Amalia:  Yeah!  And they don't know how to fix it!  So I told them, "Well, just break it again!"

Sunday, July 10, 2016

Summer Swim Team 2016

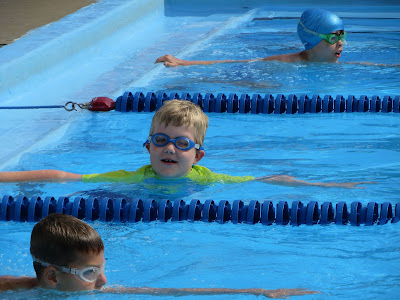
The kids are on a swim team at the community pool this summer, and, to say the least, it has been intense so far.  Between the four-times-a-week practices and 10:00 a.m. swim meets, we have been busy, busy, busy.

The swim meets are an experience in and of themselves.  We get there an hour early so they can get their races written on their hands ...


... and warm up.

Then we wait for their meets.  Amalia is in the first race of the little kids races ...


... so she usually has a bit of time to wait for Baylor's race and then her second one.  Some of the meets have been downright cold, and one towel isn't always enough.


Baylor's races are always three behind his sister, and though he might not be the fastest out there, he really enjoys swimming and has fun at the meets.


Both kids seem to really enjoy the meets, and I am proud of them for getting out there, often in the cold, and doing their best.

Saturday, July 2, 2016

My DIY Traveler's Notebook and Accessories

Back in May I was searching around on YouTube for something - I don't even remember what it was now - when I came upon all this stuff about traveler's notebooks.  Curious, I went down the rabbit hole and came out the other side determined to make one for myself, so determined, in fact, that I made one in an afternoon!  (For those of you who are unaware, I am a relatively slow-moving person.  I eat slowly, do the dishes slowly, write slowly, etc.  Getting this done in an afternoon was a miracle.)


I used the fabric traveler's notebook tutorial on Brandy Michelle Narrates on YouTube, raiding my fat quarter stash for the outer and inner cover fabric, got the super thick interfacing and some fold-over elastic from our local fabric store, and picked up some elastic and eyelets at Meijer.  Unfortunately, I did not have the crop-a-dile tool she mentions in the video and ended up ruining my regular-sized hole punch in the process.  In the end, I wound up using an awl and some precision scissors to make the eyelet holes, resulting in a less-than-ideal hole for the eyelet to set into, but it worked in a pinch.  (I do not want to have to do that again, though, so I am hoping to order a crop-a-dile soon so I can make notebooks for the kids.


As you can see, I strayed a little from the tutorial when it came to the eyelets; they were so difficult to set in the too-small holes I made with the awl and scissors that I made as few as possible.  My notebook was also a bit smaller than I had anticipated - math and measuring are not my thing, and I had already made a certain size insert so I was stuck - so I didn't want to add the eyelets side-by-side because it would have shortened the cover even more.  Instead, I used some wooden beads I had in my bead tackle box to create the double elastic on the inside; I thought the beads would annoy me, with them sticking out farther from the binding of the notebook, but I actually really like them and think they add a little character to the notebook.  As if it needed more character, right?


As I mentioned, I made the inserts myself; I had the Krafty card stock on hand and purchased the graph paper and sketch paper from Office Depot for far less than I would have spent on even one pre-made insert, so it was worth the effort.


From there I took the inserts, measured out some of the elastic cording, and hooked them together.


The first sketch paper insert and the graph paper insert went under the first elastic.


And the second sketch paper insert and a craft paper folder went under the second elastic.


Between the first and second inserts, I lifted up the elastic and slid in a card stock eight-pocket folder I made.


When I made the notebook, I also used a trick I saw on this video from Craft Made Simple on YouTube; she showed how to make the pen loops on the inside front and back cover, and I really liked the idea of having all my supplies neatly contained.  It does make it a little difficult to write on sometimes, but overall it has worked out well.


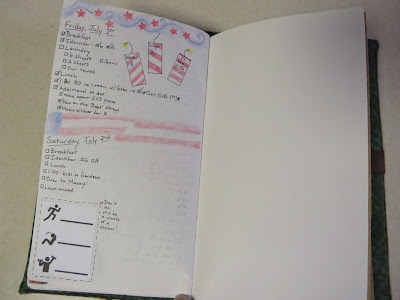
I started a bullet journal-ish style daily planner, much like I had used in previous notebooks, and while it was really plain at the beginning ...


... I started adding different colored pens, in hopes to draw attention to really important to-dos ...


... and then I got some washi tape!  Ah, washi tape!  It is so lovely.


I also got some stamps and started using colored pencils.


I also made a stencil so I wouldn't have to make wonky-shaped boxes for my eye drop and water consumption tracking every day.


Then I found a tutorial on how to make the boxes prettier/cooler/funnier.


And I got a sticker maker!  (The flowers in the upper right-hand corner are cut from a magazine and have been made into an actual sticker.)


I'll be honest, I love getting to embellish this every day.  Even if I don't have a ton of time to craft during the day, I always know at the end of the day I get to be at least a little creative as I plan out the next day's activities and tasks.


For yesterday and today I tried my hand at some actual sketching, and I'm pretty excited with how it turned out.  It isn't fiscally possible to have every kind of washi tape known to man in order to decorate each page with holiday-specific tape, but it is nice to be able to improvise with my trusty colored pencils.


I found the tutorial for the eight-pocket credit card folder on Ray Blake's YouTube channel and was able to modify it to fit the oddly-shaped notebook I made.


I really love this folder because it allows me to carry the necessities with me efficiently.


The graph paper insert, shown above with the bird on the cover, is filled with lists, ideas, and information.  Being a bit of a luddite, I even have a page with driving directions on it.


I might have to do a separate post to really do justice to the color task chart below.  We've started using it a bit more at our house, and it seems to have helped.


Not all the pages and attempts at organization have gone smoothly.  My poor Summer 2016 meals and daily plan pages are sadly still empty.  The thing is, it's always worth a try if it might make something better, right?


The last sketch paper insert has a brain decoupaged on the cover because it is intended to be a brain dump/mind sweep insert.


Needless to say, it has not gone quite as expected, but it has been a good place for random notes.


The last folder was made using a tutorial from TheSassyPineapple on YouTube, and it currently holds stickers, some extra loose paper for notes, and my DIY stencil.


So, the stickers ... I got a Xyron sticker maker on Amazon, and I have used print outs, magazine clippings, and printed personal pictures to make some fun stickers to embellish my insert pages.


I have also made some planner stickers to help get things organized on my daily pages.  I store all the little DIY stickers in the mini manila envelopes and store those in the craft folder.


I have also wrapped some washi tape around a scrap piece of plastic packaging so I could easily take it with me, and I made a stencil using a tutorial by ohaijoy on YouTube.


I used all the fun/pertinent paper punches I had.  I did want some squares and rectangles, though, so I used the large stencils I got during my brief stint as an interior design major and an x-acto knife to make some.


My birchbox full of stamps, my small supply of washi tape, and my 50 set of Crayola colored pencils round out my creative supplies.


 Inside my notebook, I have a sky blue colored pencil for making water/eye drop marks, a pencil for writing on the graph paper (it is sadly not thick enough to handle pen without a bunch of shadowing on the back of the page), a Pilot G-2 ultra fine pen in black, and a Paper Mate pen in red for checking things off and helping important tasks stand out.


 I am really enjoying the traveler's notebook system, and I feel like using it has helped me be a bit more productive.  I hope you enjoyed learning a little more about it!

(If you want to learn even more, just type "traveler's notebook" into the search bar on YouTube and binge away!  And if you have questions, please leave them in the comments, and I will try to respond as quickly as possible!)